
Selecting the appropriate PCB etching chemical is vital for producing high-quality printed circuit boards at home or in professional laboratories. This guide explores chemical options, essential safety guidelines, and best practices to ensure precise trace quality.
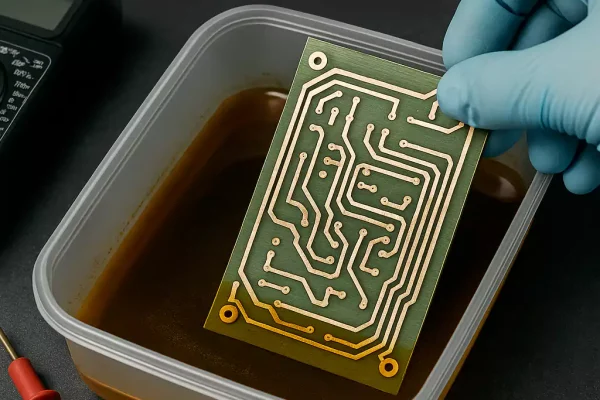
Understanding the Basics of PCB Etching Chemicals
The process of manufacturing printed circuit boards relies heavily on subtractive chemical methods to remove unneeded copper layers. Selecting an effective PCB etching chemical ensures that your conductive traces remain intact while extra metal dissolves quickly.
During this reaction, the liquid solution selectively attacks unprotected copper areas while ignoring the acid-resistant mask. This controlled chemical reaction forms the fundamental foundation for creating custom electronic circuitry reliably.
Modern circuit designs require incredible precision and sharp edge definition across increasingly dense trace layouts. High-grade circuit board etchants provide the consistency needed to prevent accidental short circuits or broken traces.
Understanding how these liquid solutions interact with raw copper sheets empowers engineers and hobbyists to achieve professional outcomes. Proper selection directly influences reaction speed, overall safety, and final board functionality.
Common Types of PCB Etching Chemical Solutions
Ferric chloride remains one of the most widely utilized solutions due to its aggressive fast-acting nature and low cost. However, its dark opaque color makes it challenging to visually monitor the copper removal process in real time.
Ammonium persulfate offers a cleaner alternative that remains transparent throughout the entire active chemical etching bath. This clarity allows fabricators to closely watch trace development and remove the board before over-etching occurs.
A mixture of hydrogen peroxide and hydrochloric acid serves as a popular homemade etching solution. It provides rapid results and easily sourced ingredients, though it requires precise mixing ratios to remain safe.
Cupric chloride is preferred in professional manufacturing environments because it can be continually regenerated using oxygen. This sustainability reduces chemical waste and lowers ongoing operational costs significantly over time.
Crucial Safety Measures When Handling Etchants
Working with corrosive liquids demands dedicated personal protective equipment to prevent severe skin burns and eye injury. Always wear heavy-duty nitrile gloves, splash-proof safety goggles, and a chemical-resistant apron before starting.
Adequate room ventilation or a fume hood is essential to prevent breathing harmful chemical vapors during operation. Never mix chemical compounds in confined spaces without active airflow moving air away from your face.
Always store your active copper etchant in marked glass or chemical-grade plastic containers away from sunlight. Metallic lids or containers must be strictly avoided because the liquid will corrode them rapidly.
Safe disposal of spent chemical solutions requires strict adherence to local hazardous waste management guidelines. Never pour spent etchant down household drains, as dissolved heavy metals cause grave environmental harm.
Step-by-Step PCB Etching Process Guide
Begin by thoroughly cleaning your raw copper laminate board with fine steel wool and isopropyl alcohol. Once clean, transfer your circuit artwork onto the surface using photoresist films or laser toner transfer paper.
Carefully submerge the prepared board into your chosen chemical etchant bath heated to recommended working temperatures. Maintaining warm chemical temperatures accelerates the reaction speed while producing sharper, cleaner trace edges.
Gently agitate the bath container continuously to circulate fresh liquid across the raw copper surface continuously. Continuous movement prevents stagnant liquid pockets from slowing down localized etching and causing uneven copper removal.
Once all excess copper dissolves completely, carefully lift the board out using plastic tweezers or tongs. Immediately wash the newly etched board in fresh water to halt chemical action completely before final inspection.
Maximizing Precision and Preventing Over-Etching
Controlling liquid temperature remains one of the most effective ways to balance speed with detailed trace quality. Operating within the optimal range of 40°C to 50°C yields reliable results without generating excess hazardous fumes.
Inspect your active bath regularly to monitor chemical saturation levels and overall reaction efficiency. Exhausted chemical baths take significantly longer to strip copper, increasing the likelihood of lateral trace undercutting.
Keep a close eye on fine trace geometry to prevent unwanted undercut underneath your protective resist pattern. Proper bath agitation helps chemical solutions strike perpendicular to the board surface rather than dissolving sideways.
Strip away the remaining protective toner or film using acetone or dedicated chemical solvents after rinsing thoroughly. Inspect your finalized traces with a magnifying glass to check for hairline bridges or unexpected circuit breaks.
Master Your Homemade Circuit Board Fabrication
Taking control of your custom prototyping process allows rapid design iterations without waiting weeks for external fabrication factories. Master individual steps to produce high-density boards from your workshop efficiently and reliably.
Experimenting with different chemical choices helps you find the perfect balance between processing speed and workplace safety. Choose high-purity chemicals and maintain rigorous control over temperature and agitation variables.
Integrating systematic safety protocols ensures your prototyping environment remains clean, efficient, and completely safe. Consistent practice yields consistent trace geometry, allowing complex surface-mount designs to perform flawlessly.
Equip your workspace with high-grade safety equipment and proper storage tools before starting your next electronics project. Reliable chemical processing transforms your conceptual schematics into physical, functional circuit boards seamlessly.
Frequently Asked Questions
Which PCB etching chemical is best for beginners?
Ferric chloride is generally recommended for beginners due to its wide availability and straightforward handling requirements. However, ammonium persulfate is also great because its clear solution allows easy visual monitoring.
How long does the etching process usually take?
The overall process typically takes between 3 to 15 minutes depending on liquid temperature and chemical concentration. Agitating the solution actively accelerates the copper stripping process significantly.
Can I reuse my chemical etchant solution?
Yes, many etchants like ferric chloride and cupric chloride can be reused multiple times until saturated. Store used chemicals in sealed plastic containers until the etching speed noticeably slows down.
